In these difficult times I feel fine about making up a new word. I define it as the opportunities a lock down can provide.
We are weirdly busy at work, and with reduced staff numbers in the building, I find myself doing more to keep things running. While being grateful for the ability to be open, operating and employing in an almost normal way, I am sincerely worried for my staff and their exposure, but we are following all guidelines and making some up ourselves. (e.g. we still process film, and are one of the few businesses that can process uncommon types of film, we had to put a quarantine on incoming film. Mostly because some types require licking of the backing paper to seal it up….yes licking.)
So, am I making another excuse for not having my boat launched in these restricted times? No, I’ve been busy, working up to the maximum my wrist can cope with, which is about 4 hours at a time.
My favourite sneaky view I can see when I exit my office. That’s the boat through that narrow doorway. 🙂
I chose to fibreglass the interior sides as well as the floors. While not prescribed, I felt it would be good for impact protection and durability of locker internals. The process involves the following; Ensuring the surface being ‘glassed is even, so potentially it needs to be faired first. Fibreglassing it dry to prevent sagging in the epoxy on the upright surfaces. Potentially sanding the fibreglass to take out lumps. Filling the cloth weave with epoxy that has a little lightweight filler to fill it quickly without sagging. And a final sanding to make it fair.
Festool Rotex 150 at work
It is a slow process, one I did not account for. Thankfully late last year Morgan could spare some time and the fibreglassing was done leaving me to do the finishing. And I am almost finished this stage.
Next I will be building in interior furniture. Yay!
Looking forward you can see the filled and faired interior coming together.
All this time I have been working out where to move the enclosed head to. I do not like it’s position just forward of the centreboard truck to starboard, it shrinks the cabin so much. It takes what should be a generous welcoming space and chops it up too much.
That being said, I cannot get rid of a private toilet space on the boat, I am not an animal. (Plus I have a wife and two daughters).
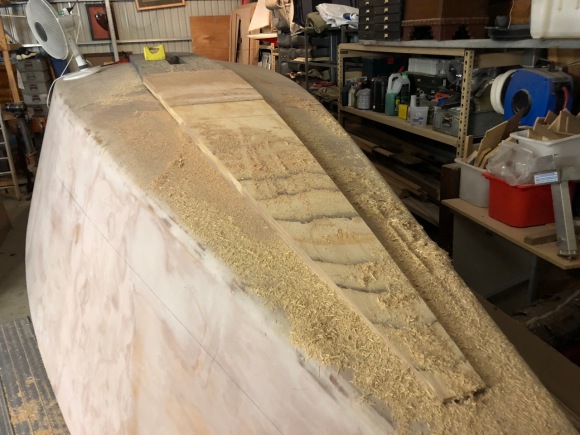
The hull bottom is made from three layers 200mm wide strips of 6mm ply, cold moulded, the first layer runs perpendicular to the centre line, the second and third are planked opposed diagonally . This creates a very strong self supporting structure of its own, but it does result in an uneven surface which needs filling and fairing.
Funny to be back fairing again! Thankfully it’s all under foot, under locker and under bunk, so no one is worrying about it’s hydrodynamic performance. I jumped into mixing epoxy and a new (to me) type of light filler, the West System’s Light Weight Filler.
I’m very used to the BoteCote’s micro balloons, and they have served me well, but I really like the West System equivalent of the filler (Microlight 410). It’s hard to describe, perhaps ‘fluffy’ is a good term. It mixes in quickly, and bulks out well. In the consistency I am using it, which was quite wet, it is a pinkish plastic consistency. It set hard and shaped well with a course paper on the random orbital sander.
Each irregularly shaped compartment of the Sharpie has a bit of flooring, so the process is to clamber up into the boat, hopefully remembering all of the tools required, sand the section, working with 40 or 60 grit paper, switching between the extractor connected Festool Rotex 90 set with the corner detail fitting and then the big 150 for the middle bits. Then hop out to mix the epoxy. Then hop back in, spread it out, spatula it smooth and clean up. The next time I’m back on the boat, I check and sand the filled floor to smooth and patch with the next mix of filler if needed.
I could have just sanded the whole interior, then filled, but it’s too much of the same thing for my wrist and brain. It has gone quickly and looks great.
In an attempt to wrangle our lives under our control, we decided to sell our house (and huge shed) and move into the apartment above our business. It was a decision made for financial and emotional reasons, an attempt at simplification. To explain it further would require a War and Peace grade novel, not what this little blog is for.
So how did turn the boat get turned over?
To set the scene, I’ve been struggling to do heavy work on the boat since the surgery to my wrist in December, we decided to auction our house in March. We decided to move out of the house to stage it properly, we decided straighten up the shed but use the boat build as an attraction. We had to move the boat at settlement, and as a bare minimum, the hull anti fouled and onto the trailer right side up.
I was truly a deer in the headlights about it all. I made many calls to friends and professionals, I received many offers of help, but all required my leadership, and I was not in a good head space for that.
Robert Ayliffe was aware of my state, I think he could see this coming and offered to help push this through. Robert lined up two helpers, Morgan and Sebastian. All three of them dove in to the fairing and glassing of the lead and wood keelson I had formed.
They worked like demons possessed. More was achieved in those few weeks than I had in the past year, I think there is an advantage in not being the pedantic owner and builder. You cannot imagine how good it felt to see this boat rise up, flip, and rest on its rightful bottom.
Seb stayed through the fairing, but Morgan and Robert saw it home. During the last week before settlement of the house, the pressure rose. Everything had to happen before Tuesday, us moving out, the hull, trailer, turning and the Goolwa WoodenBoat Festival.
I’m not sure exactly how, but Robert turned up on the Tuesday morning, after throwing himself through the 2019 festival, with Ian Phillips of Botecote, and Marrack Payne in tow and a carload of heavy lift gear. Also joining us was Graham Crane and the mighty Morgan Clarke. All six of us keen to see this through or perhaps wanting to gawk at whatever happened.
At this time, none of us were sure of how this was to be accomplished. I’d heard several theories, and fearing a competition of opinions, I kept quiet and wide eyed. Full marks to Robert for picking the team, as half the crew voiced strong opinions, but all settled and supported Robert’s plan, slightly adjusted from the discussions. I am sure arguments at this stage could have wrecked the hull, or one of us.
I had imagined two slings on the boat’s thirds, lifting, and a control line easing the turn. This control line was to be critical because the center of gravity is just below the lead, and once it began to turn, it was likely to swiftly run away from us.
Robert’s plan, and the way we achieved the turn was to make a single lift through the centreboard case, on the designed centre of gravity, the forward end of the case. Once the weight was off the building frame, we could cut that away and leave it free hanging, and use manpower and blocks to stabilise. This was very quickly achieved, a matter of thirty minutes.
Once it was freely dangling, a control line was attached to the same lift point, but coming out from under the hull, off to the side and up. This would lift the sharpie onto it’s starboard beam, and onto a mattress slid in place. With some further effort, we stabilised it on this side, and swapped the main lift point to exit the inside of the boat, and lifted once again. Within minutes, the boat was aloft and the trailer was being backed underneath.
It was truly marvellous. All the worrying had distilled down to a brilliant series maneuvours. We were all beaming with pride and relief.
The boat was then towed the five kilometres to it’s new home, and even though Robert had insisted on placing the boat well forward on the trailer (thus minimising the overall length), my measurements of the it’s new home had failed to predict the shed was 10cm short for the sharpie and I couldn’t close the roller door.
Graham jumped in and designed a method to cap off the entrance flush so we could lock it all up, while I returned to the shed to tidy up for the new owners. That night I went to bed with the boat locked up and snug. First good sleep in months.
Significant thanks must go to Robert for picking up the lead, Morgan and Seb for their energy and great work, and Ian, Marrack and Graham for being so level headed, strong and supportive.
I’ll be celebrating this effort for the rest of my life.
This is the story of Robert and Ian’s crossing to Tasmainia in Charlie Fisher, his 23′ NIS. Thanks to Robert and Australian Amateur Boat Builder Magazine for this rollicking tale.
While I get my thoughts together to tell of the past six months, I dug up a couple of articles that mean a lot to me. Please take time to read them both, they appeared in the Australian Amateur Boat Builder, both written by Robert Ayliffe. Enjoy.
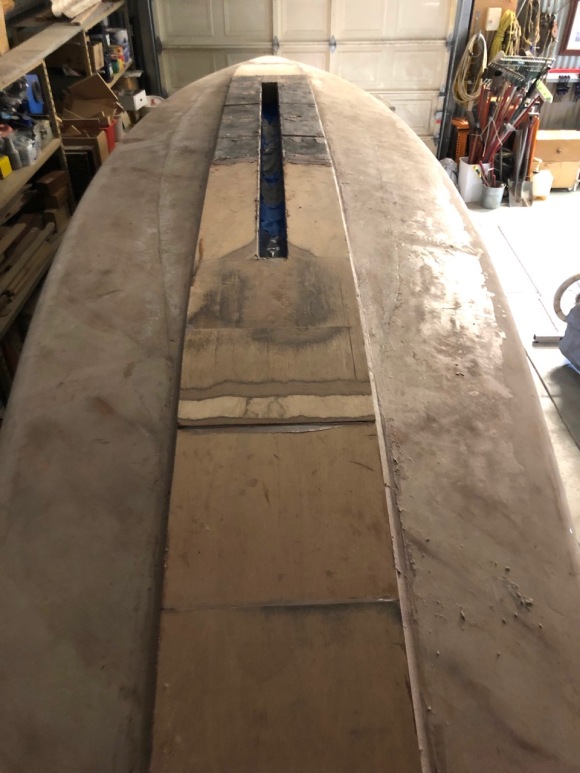
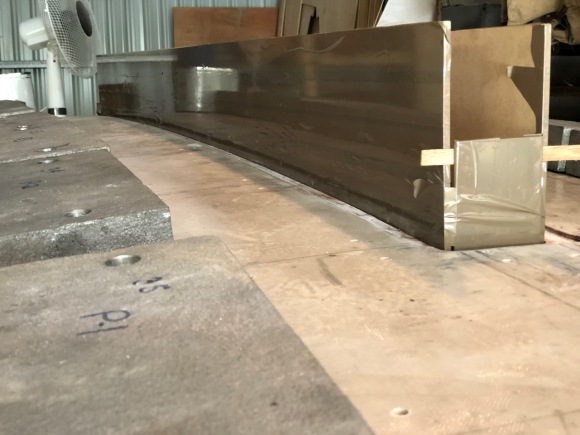
With the lead securely fitted, I had to make a ‘shoe’ that would lead the water into the lead and back out the stern, making the bottom hydrodynamical sound.
I chose to use 16mm ply and laminated it on the hull. Because of the significant amount of rocker (longitudinal curvature), the plywood would need to match the curve. After setting out some plastic sheeting to prevent it prematurely glueing to the hull, I held the layers down with straps and cross bars while the glue cured. This went well.
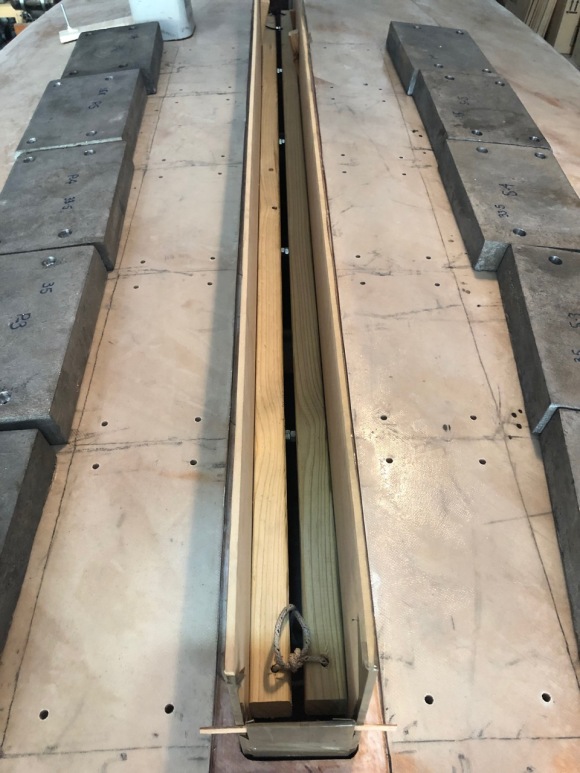
The dowel is being used to clamp the ply shoe down as the laminating cures
I then attempted to glue the forward shoe down in one go…which I rapidly realised was a huge mistake.
Not only is the hull curved longitudinally, but it also has a gentle cross curve, which is a part of the Mark 2 design refinements. This cross curve meant the ply would need to be made to curve in a second dimension, which is effectively impossible when dealing with thick ply. Therefore, the ply would need bedding in a significant amount of thickened epoxy to support it. And, you cannot mix up that much epoxy at once without it curing in your hands.
After throwing away the first litre of mix, by scraping it off the hull as it hardened, I cut the sections in quarters, with 3:1 scarf joints, and set about fixing them one at a time. This worked well, and progressed quickly because it wasn’t delicate work.
Within a few weeks, all the shoe was attached, and fairing and filleting had begun.
Just after I attached both fore and aft sections, Robert, Morgan and Seb stepped in and began the push to getting the boat turned. It was their filleting, fairing, fibreglassing and finally antifouling that got it turned and in the new home.
The bow section being shaped by a planerLooking forward pre-fairingThe bow knuckle added to with epoxy mixed with high strength filler
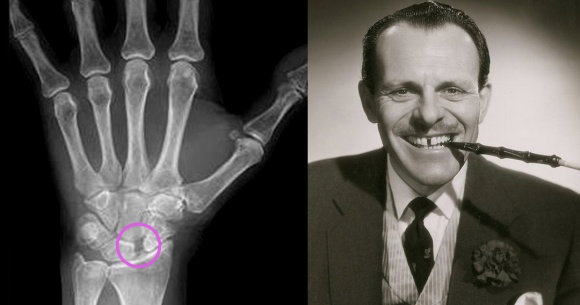
What I did not need is another excuse for slowing/stopping progress, but I’ve found a ripper. A fall while off-trail bushwalking in October 2017 apparently tore a ligament allowing bones to rearrange themselves in my left (dominant) wrist. The condition is called SLAC wrist, or the charming “Terry Thomas Sign”. I’ve always loved the pantomime villain Terry Thomas played in some of my favourite movies, he was brilliant.
At the time I ignored the hurt, but during 2018 it got worse so I pursued a gradual escalation of medical intervention. That ended with an attempted reconstruction in November 2018. Once into the wrist with his knife, the surgeon discovered too much arthritis to proceed. Apparently the left wrist is riddled with it, quite a mess. There are also signs my right wrist may also be arthritic. The Doctor didn’t want to risk pulling it all tightly back together, when it wasn’t going to fit. So he set about performing an arthroscopic cleanup.
The medicos think the heavy fairing process did a lot of the recent damage, and I’d have to agree. I could never sustain fairing with a torture board for long, and was sore for days afterwards.
The whole thing has left me feeling pretty down and rapidly aged. It turns out I can’t do it all, being a part-time boat builder when I spent a life as a desk jockey has consequences.
I am writing this in March 2019 feeling about as recovered as I will be from the arthroscopy and news of the reality. I am feeling better in myself now, I’ve reconciled how I can progress with the build, I have also made real progress, I’ve changed out some tools, and learned a few new techniques which I will share in future posts.
I have also embraced some help from friends and I am deeply touched by their support.
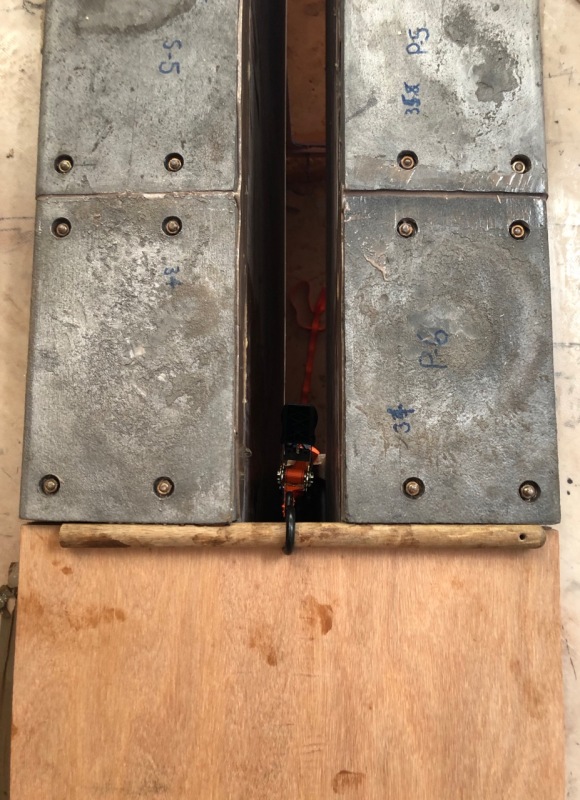
Once the tiles were drilled and positioned on the boat, I could follow the drill holes and drill through to fit the bolts.
I hate making holes in a perfectly nice hull, it runs against the my best instincts!
It went very quickly and flawlessly. With coach bolts, the shaft has a little square section just below the domed head, this is to prevent the bolt spinning in the material when you tighten the nut. In my case, this would need to be forced into the hull timber and I was keen not to round it out because the bolt would need removing and replacing for the final tighten once bedded in epoxy. I was careful to orientate the square shaft with the centreline, so I could replace it precisely when it’s all dripping with fresh epoxy.
The next challenge is to devise a plug for the centreboard slot, so it would not fill with epoxy when I bedded in each tile. For this I separated 4mm MDF pieces with a wedge-adjustable spreading mechanism. The mdf was then coated in packing take and jammed into the slot.
I also needed to devise a way to lift each tile and lower it into the fortified epoxy bedding, it would need to be a direct lowering, so as to maintain as much epoxy under each tile as possible and allow for even squeeze out. Using some 16mm ply wood, with a huge course screw in each end, I could use the bending of the ply to force the angle of the screw so it grips the inside of opposing holes in the tiles, the photo hopefully will show it clearly.
Next step was to mix some epoxy and using a pipe cleaner to wet out the tile’s bolt holes from above and below. From here I could use the rest of the mix and add in the high strength filler (fortifier), and bed in each tile one by one.
When one tile was in place on top, I tapped in a pair of bolts from above to align it with the holes drilled. Then I had to scurry underneath and tap in each bolt, driving out the alignment bolts, then orientate the square parts of the shaft with the centreline, drive them home, then scurry back up on top and fumble the washer and nut, trying not to allow the unsecured bolt to slide back down the hole. Which it did often…
Next is tightening up the nuts with a box wrench, then cleaning up the squeeze out, which by then was beginning to harden in the Adelaide summer.
Phew. I could do two in a session, it was hard on my wrists and nerve wracking.
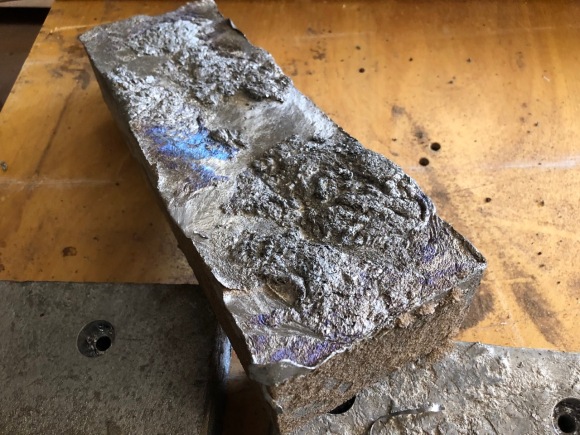
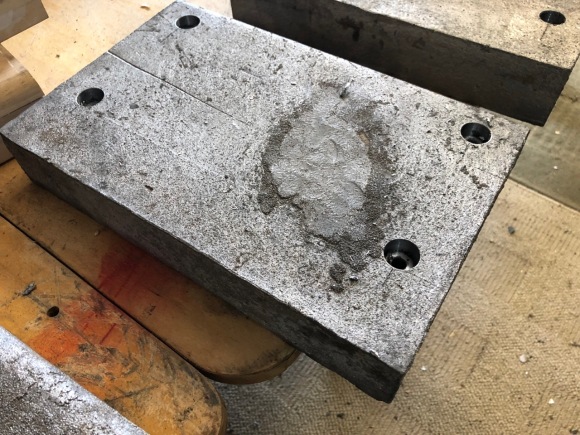
Working the lead tiles I had cast at the foundry was a bit brutal, the 36kg blocks required a heavy hammer, solid benches, slow drills and a very deliberate workflow.
Each tile had issues with the shape, hollows and lumps and tags on the edges in some instances. I chose to hammer away at these issues, with the lead being soft enough I could bludgeon it into shape like a blacksmith would. It was quite rewarding, but really hard on the hands and wrist.
To fasten the lead to the outside of the hull, I am using 8mm silicon bronze coach bolts, one in each corner of each tile. The tiles will also be bedded in thickened epoxy, which will contribute to the fastening. Therefore, each tile needs to be drilled for bolting, the nuts will be recessed in the lead, and the domed head of the coach bolt will be on on the inside of the hull. To recess the nut I have to cut a shoulder in each hole.
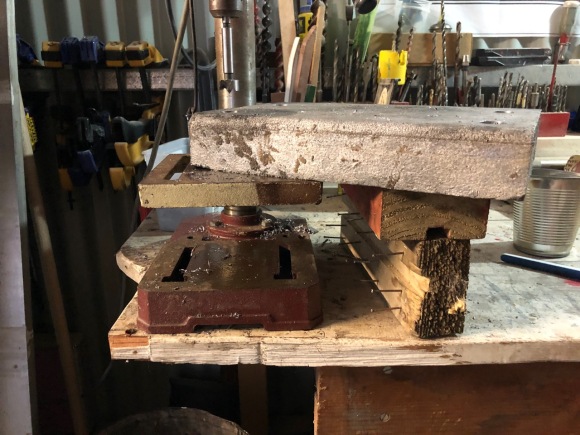
With each tile’s corner marked out with a scribe, I used a drill press on a very slow speed to do the drilling. Lead is a fiend to drill, I am lucky these holes are 8mm, because a fine drill bit, heats and fails quickly. I began with the shoulder cut, initially I used a Forstner bit, but keeping it cool and sharp was impossible. I quickly switched to a spade bit, which made it very easy.
It is a job best done with feel and lots of kerosine. You need to carefully plunge in drilling and try and sense the lead getting to a melting point, then back off, add kero, let it cool, then plunge in again. Slow speed, with moderate pressure. When you get the elements working, you get rewarding progress. While I killed the forester quickly, the thin spade bit shed the heat quickly, and stayed sharp.
Following the shoulder hole, was the 8mm through hole. This was a trickier technique to perfect, I am so good at it now! This also took slow speed, an lots of kero, but the bit jammed up much easier, so gaining a feel for the lead melting was everything. If I used a lot of pressure I could almost match the drill press speed and create perfect unbroken curls of lead swarth. It was the closest I’ve felt to being a surgeon.
(please note, this is a catch up post, I’ve not been on blogging this past year)
One day mid 2017, I deemed the hull of the sharpie fair. Which it isn’t (in my mind). But it’s fair enough which is fair-enough. Frankly I was sick of the machine I had created that turned epoxy and lightweight filler into dust for my vacuum. It was time to move on.
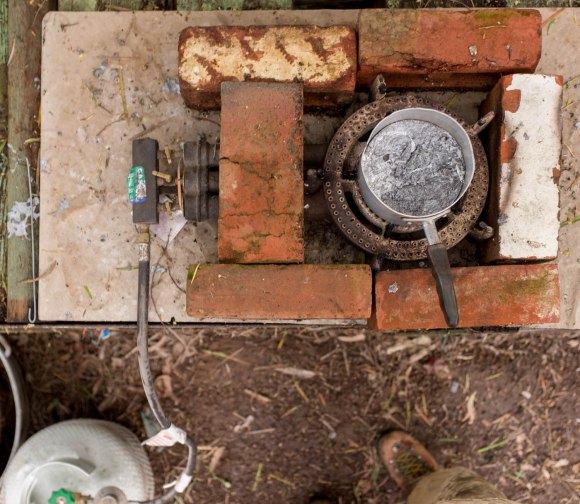
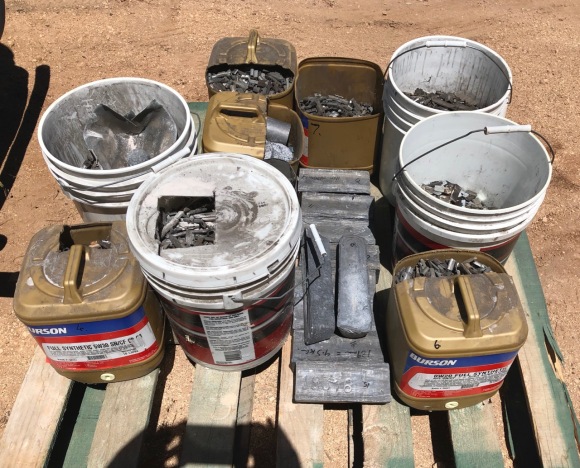
I had been visiting my local tyre purveyors, namely the lovely folks at Bridgestone Select Norwood, to collect tyre balancing weights, I had hundreds of kilograms, which when added to what Robert Ayliffe (my lead faerie) has gifted, got me to the magic 480-ish kgs. So I went foundry hunting.
This exercise lead down a pricey path. I got the first quote for casting the tiles at over $150 per tile from a leading local crew. And this took six months to get the quote! So I chased down a little gem in Bowden, such a striking throwback to when a factory playing with seriously heavy metal sits amidst dense housing. The Bowden crew wanted over $3000 to do the casting. They cited the cost of electricity, but after touring the premises, I reckoned the cost of site clean up will make the running cost insignificant. They are virtually gutter to gutter with residential, and the feeling that their days are numbered was overwhelming.
It’s one of those sad realities of a city growing up. I spent much of my youth in Brompton at my Grandparents’ place around the corner from this factory, and I loved the blend of industrial and residential. But like Trump and kindness, it just incompatible.
For a moment I considered doing my own casting, thinking about blending my own residential with industrial. And I would have got away with it if I hadn’t been thinking…
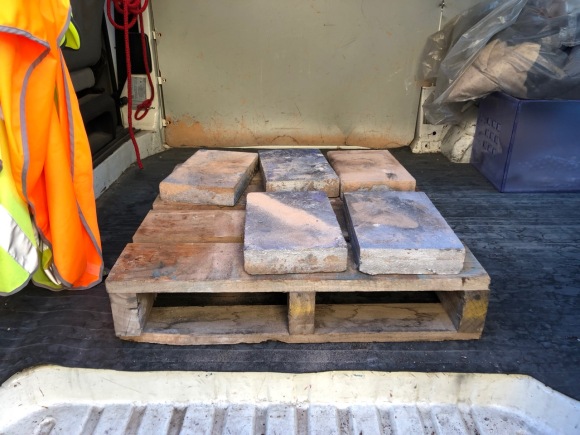
When looking further afield for an alternative, I called on Callington Cast Iron, and met with Jim who quoted me $35 per tile to cast, that would total $455…Quite a difference from over $3k. Just in-case he had second thoughts, I delivered all of my lead as quickly as possible.
After a week went by, Jim delivered me some news. The tyre weights are useless. Hardly any lead in them, and what can be extracted is not worth the effort…
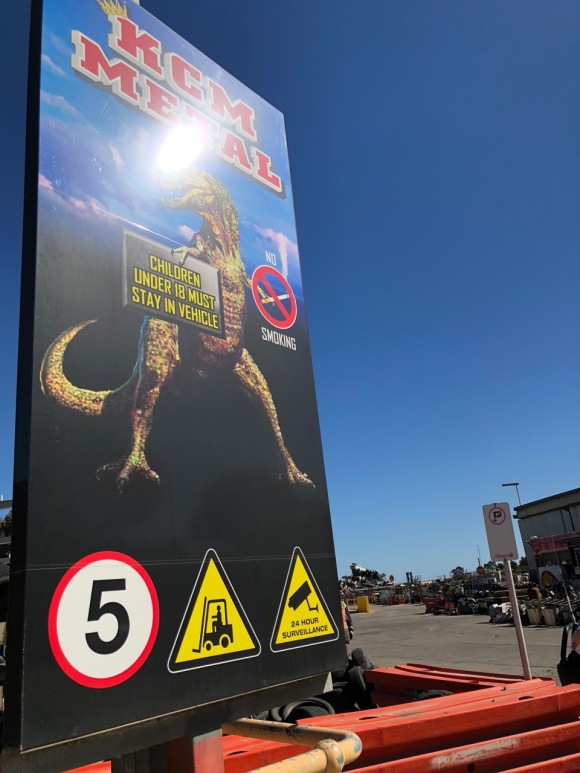
Bullet biting time. I had to buy lead from a scrap dealer, I hit the phone and found the best price is $4 per kilogram at KCM Metal.
Knowing you have to spend the money, you should get on with it and smile. This is meant to be fun. Thankfully KCM was a joy to deal with, the owner has a good sense of humour and runs a great little business, I hope he is getting rich, it’s a dirty business in every way. I especially love the T-Rex he owns. We should all have a large pre-historic killer nearby on a leash.
Two trips with the van, and much cash parted with then back to Callington Cast Iron: Initially I gave Jim thirteen styrofoam ‘plugs’ that were to be used in a lost casting method, where the molten lead would vaporise the foam that was packed in casting sand. This produces the best shaped tiles, with square sides. But because of the trouble with the tyre weights, he chewed through a few of these. Jim talked me into making a wooden plug, which would need tapered edges to remove from the sand. Not ideal, but workable.


 The hull bottom is made from three layers 200mm wide strips of 6mm ply, cold moulded, the first layer runs perpendicular to the centre line, the second and third are planked opposed diagonally . This creates a very strong self supporting structure of its own, but it does result in an uneven surface which needs filling and fairing.